Project introduction
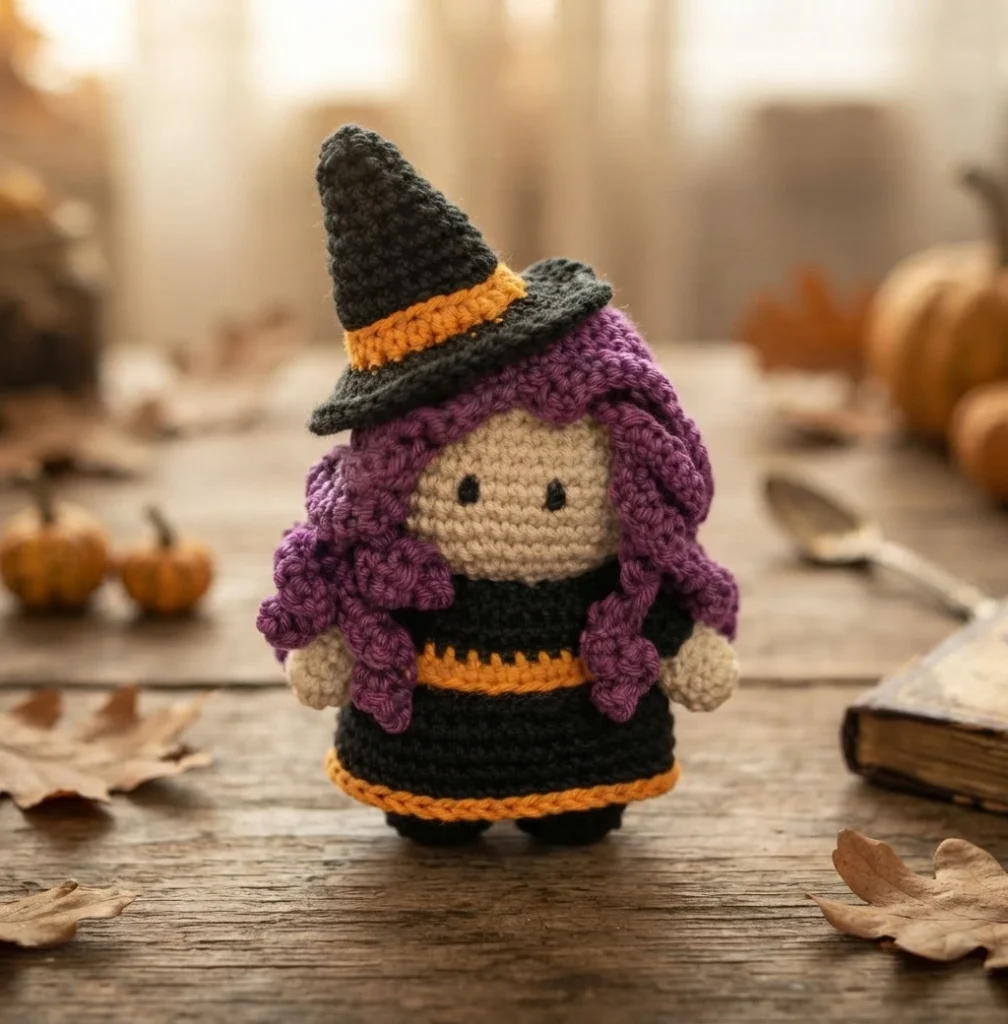
Little Crochet Farm’s Little Witch is a Halloween amigurumi doll made from several crocheted pieces, including a skirt, body, hair, arms, and hat. The creator describes the project as beginner-friendly and provides a video tutorial. This article is an overview, not a complete tutorial or a replacement for the pattern’s shaping and joining directions. For those instructions and the creator’s visual guidance, use the original Little Witch pattern by Little Crochet Farm.
Member?
The crochet pattern is available to read free on the website. A printable or PDF edition is a separate format, not a condition for accessing the free web pattern. The source also provides a member download and directs nonmembers to register for that download option.
More Spooky Amigurumi to Crochet This Halloween
For other seasonal projects from Little Crochet Farm, browse the Chubby Black Cat and Mini Frankenstein. The source also points readers to its Halloween Cats in Costume series and mini Halloween amigurumi collection.
Your crochet. Your Rules!
Membership is optional. The source describes member access as ad-free browsing and online access to patterns, with a choice of PDFs to download each month from its library. Members can also provide input on future designs and receive priority support. Membership may be cancelled at any time.
Prefer a PDF Version Of this Pattern?
The separate PDF edition is described as ad-free, detailed, and text-only in a print-friendly format. The source lists it as a separate paid printable option as well as providing a member download route. Choose the free web instructions or a PDF format according to how you prefer to read; the construction notes here do not replace either set of full directions.
Materials
Gather the listed tools and yarn before beginning. The materials paragraph names four yarn colors, while the arm instructions also call for white, so include that color if following the full project.
- 2 mm crochet hook.
- Orange, purple, black, beige, and white yarn. The creator identifies the yarn used as 100% cotton, light worsted, 6-ply.
- Black thread for embroidered eyes, or safety eyes as an alternative.
- Stuffing material.
- Scissors.
- Sewing needle for joining and finishing.
Finish size
The finished doll is approximately 4 inches (10 cm) tall. The creator notes that the result can vary with stitch tension and materials, so treat this as an approximate reference rather than a guaranteed finished measurement.
Gauge
A precise gauge is not required for this pattern. The creator recommends selecting a hook that suits the yarn and suggests using a slightly smaller hook if needed to keep the stitches close and the stuffing from showing. Adjusting the hook may change the finished size and fabric.
For the stated sample gauge, sport-weight yarn with a 2 mm hook measures about 1.6 inches (4.5 cm) across five rounds, increasing to 30 stitches. This is a reference for the creator’s materials, not a separate size target for other yarn choices.
Useful Crochet Tutorials
The pattern’s linked technique resources cover the magic ring, working single crochet in the round, increases, invisible decreases, back-loop slip stitch, color changes, front-loop single crochet, and fastening off amigurumi. These references can help when checking a stitch or technique before working from the full pattern.
- Magic ring and single crochet in the round.
- Single crochet increases and invisible decreases for amigurumi.
- Back-loop slip stitch, color changes, and front-loop single crochet.
- Fastening off an amigurumi.
Terms and abbreviations (US terms)
The pattern uses US crochet terms. This short glossary clarifies the abbreviations without setting out a sequence for crocheting the doll.
- sc: Insert the hook into a stitch, pull up a loop, yarn over, then pull through both loops on the hook.
- inc: Work two single crochets into the same stitch.
- dec: Insert the hook into the front loops of the next two stitches, yarn under and pull through, then yarn under and pull through both loops on the hook.
- blsl: Insert the hook into the back loop of the stitch, yarn under, and pull through both the stitch and the loop on the hook.
Skirt
The skirt begins in orange and changes to black. Its shape widens before the piece is fastened off and set aside. It is later joined to the body during the body rounds, rather than simply sewn on as a completed final accessory. Follow the original pattern for the exact stitch placement and joining instructions.
Body
The body starts with two black legs that are joined to form the lower section. The skirt is incorporated as the body continues, and the yarn changes to beige for the upper body and head. The source places the start of stuffing after round 17 and calls for completing the stuffing before the final closing rounds. Consult the original for the leg join, round shaping, and exact construction details.
Hair
The hair is worked in purple, beginning as a rounded piece before continuing into a shaped section that forms the curls. The creator’s directions leave a long tail for sewing the piece to the head. During assembly, the curls are arranged and connected with small stitches; use the source instructions and video for the specific shaping and placement.
Arms
Make two matching arms. Each starts with white yarn and changes to black, with a small tail left for sewing. The pattern’s round-by-round directions specify the shaping, color change, and finishing details.
Hat
The hat begins in black, forming the cone, then changes to orange for the brim. The brim includes loop-specific stitches and increases. The source leaves a sewing tail when the piece is fastened off. Refer to the original for the exact stitches and shaping.
Assembly and final details
The source places the arms at body round 16 and the eyes at round 23, with four stitches between the eyes. It recommends pinning the hair in position with the central part facing forward before sewing it to the head, then arranging and joining the curls with small stitches. The hat may be positioned as desired; the creator’s sample is held with three stitches. The video provides visual guidance for these finishing placements.
Your Little Witch amigurumi is ready!
With the separate pieces joined and the finishing details in place, the seasonal doll is complete. Keep the original Little Crochet Farm pattern available while working, since this overview intentionally leaves out the full round-by-round instructions and detailed joining directions.



1 thought on “Little Witch Amigurumi Halloween: Pattern Overview”