Project introduction
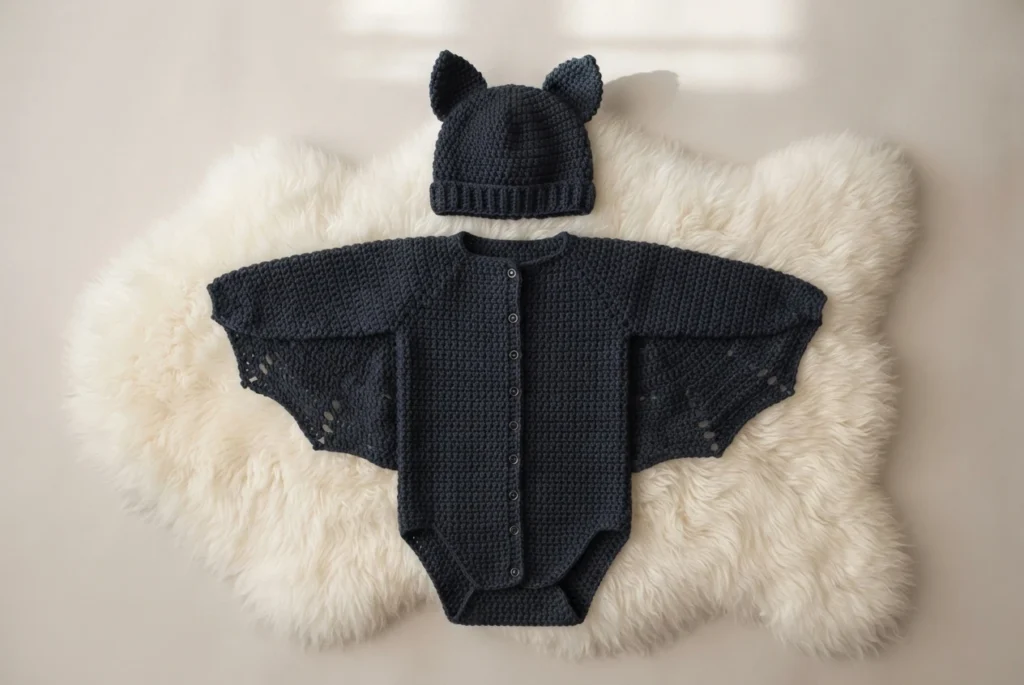
This winged baby bat onesie with a matching hat is designed for Halloween or costume parties, and it keeps comfort in mind: snap tape closures make dressing and changing simple. The stated skill level is Intermediate. Sizes are Onesie: 6 (12) months, 17 (18) inch chest; Hat: Baby (Toddler), 14 (16) inch head circumference. Gauge is 16 sts and 20 rows = 4 inches [10 cm] in sc with the larger hook.
Materials
You will need Malabrigo Yarn Merino Worsted (100% Merino Wool; 210 yards [192 meters]/100 grams) in color 508 Blue Graphite, using 3 (3) balls. Hooks required are US size H/8 (5.0 mm) and US size J/10 (6.0 mm). Notions include a yarn needle, stitch markers, and 1/4 yard of black snap tape.
Special Stitches
The pattern uses one special stitch: Ch-3 Picot. To make it, chain 3, then slip stitch into the third chain from the hook.
Pattern Notes
Rounds are not joined unless specifically noted. Place a stitch marker in the first stitch of each round to track progress. If only one number is given, it applies to both sizes. Note that Ch 3 at the beginning of a row does not count as a double crochet. This overview describes the construction and key numbers; it is not a complete pattern, and the full row-by-row instructions are available from the designer.
Back
Using the larger hook, start with ch 13 (17). Row 1 establishes 12 (16) sts by sc in 2nd ch and across. Row 2 is a plain sc row. Row 3 increases at both ends to 14 (18) sts, and the increase and plain rows repeat in pairs through Row 21 to reach 32 (36) sts. Work even in sc for 40 (45) rows after shaping.
Armhole Shaping
Row 1 skips the first 2 sts and leaves the last 2 sts unworked, resulting in 28 (32) sts. Rows 2-11 work even. Row 12 leaves rem sts unworked after sc in first 7 (9) sts. Row 13 decreases via sc2tog to 6 (8) sts, Row 14 works even, and Row 15 repeats the decrease to end with 5 (7) sts. Work even for 3 (5) rows.
Ribbing
Change to smaller hook, ch 4. Row 1 joins the chain to the fabric with sc and sc2tog, creating 3 sts. Rows 2-3 use sc blo and sc2tog blo to form the ribbed texture. Repeat these rows across the 5 (7) shoulder stitches. Fasten off. Join yarn at the opposite side and repeat from Armhole Row 12.
Front
With larger hook, ch 11 (15). Row 1 creates 10 (14) sts. Row 2 increases at both ends to 12 (16) sts, and the increase and plain rows repeat in pairs through Row 13 to reach 22 (26) sts. Row 14 adds a ch 6 extension and sc across to get 27 (31) sts. Row 15 repeats this to reach 32 (36) sts. Work even in sc for 40 (45) rows.
Armhole Shaping
Work same as Back section up to Ribbing. Fasten off when complete.
Neckline
With smaller hook, join yarn at the neck edge, ch 3. Row 1 uses sc and sc2tog to create 2 sts. Rows 2-3 establish the ribbed edge with sc blo and sc2tog blo. Repeat around the neck edge from one shoulder to the other. Fasten off. Sew side seams. Sew snap tape to the shoulder seams, overlapping the ribbing. Tack the armhole edges.
Sleeve (make 2)
With larger hook, join yarn at the underarm seam. Rnd 1 sc 32 (34) sts evenly around, turning at the end. Rnds 2-3 work even. Rnd 4 decreases via sc2tog at the start and end to 30 (32) sts. Rnds 5-6 work even. The decrease and even rounds repeat in three-round cycles through Rnd 18, then Rnds 19-20 work even and Rnd 21 decreases to 20 (22) sts. Work even in sc for 14 (18) rnds, turning at each end.
Ribbing
Change to smaller hook, ch 3. Row 1 joins to the sleeve edge with sc and sc2tog, creating 2 sts. Rows 2-3 use sc blo and sc2tog blo for the ribbing. Repeat around the sleeve edge. Fasten off.
Wing (Make 2)
With larger hook, ch 6. Row 1 places 3 dc. Rows 2-11 build a fan-like structure with increasing dc counts and ch-2 spaces between segments, reaching 33 sts. Row 12 transitions through sc, hdc, dc and tr stitches, placing ch-3 picots in the ch-2 spaces. Fasten off.
Finishing
The wings are sewn to the underarms, following the designer’s photos as a placement guide.
Leg Edging
Join yarn at the left side seam of the leg opening. Sc evenly around, working 3 sc in the corners. Fasten off. Sew snap tape to the bottom of the Front and Back, using the photos as a guide. Weave in ends.
Hat Pattern Overview
With larger hook, begin with a magic ring. Rnd 1 works 6 sc and joins with sl st. Rnd 2 doubles the stitches to 12, then each subsequent round adds one more sc before the increase, growing the circle to 60 sts by Rnd 10.
Size Toddler Only
Rnd 11 increases further to 66 sts by working *Sc in next 9 sts, 2 sc in next st* around.
All Sizes
Work 15 (18) rnds even to maintain 60 (66) sts.
Ribbing
Switch to smaller hook, ch 5. Row 1 joins to the hat brim with sc and sc2tog, creating 4 sts. Rows 2-3 form the ribbed band with sc blo and sc2tog blo. Repeat around the entire circumference. Fasten off.
Ear (make 2)
With smaller hook, ch 9. Row 1 makes 8 sc. Row 2 increases to 10 sts. Rows 3-4 work even. Row 5 increases to 12 sts. Rows 6-9 work even. Rows 10-15 decrease steadily via sc2tog pairs down to a single stitch. Fasten off.
Finishing
Sew the seam in the ribbing. Attach the ears to the hat using the photos as a guide. Weave in all ends securely.
Quick checklist before you begin
- Confirm both hooks are on hand: H/8 (5.0 mm) and J/10 (6.0 mm).
- Count your yarn: 3 (3) balls of the listed colorway.
- Cut 1/4 yard of black snap tape and set it aside for the shoulder and leg closures.
- Swatch in sc with the larger hook until you match 16 sts and 20 rows to 4 inches [10 cm].
- Keep a stitch marker in the first stitch of each round, since rounds are not joined unless noted.
- Remember that a Ch 3 at the start of a row does not count as a double crochet.
The onesie and hat are both worked from written row and round instructions, with the wings and ears made separately and sewn on at the end. This page is an overview only. The full pattern is available from I Like Crochet, where web access and any paid printable or PDF options are set by the publisher.
Original designer’s pattern and instructions (free web access; paid printable or PDF access, if offered, is handled by the publisher)
Crochet Wall Hanging Pattern - Baby Fox Nursery Decor: Pattern Overview