
Project introduction
This Frankenstein-inspired candy bowl is a Halloween decoration with an open mouth and separately made facial details. The free web pattern and complete instructions are available from A Crocheted Simplicity, the original designer. This page is an overview, not a complete tutorial. A separate ad-free, printable PDF with photo tutorials is available to purchase through Ravelry or Etsy.
Halloween Decorations or Crochet Gifts
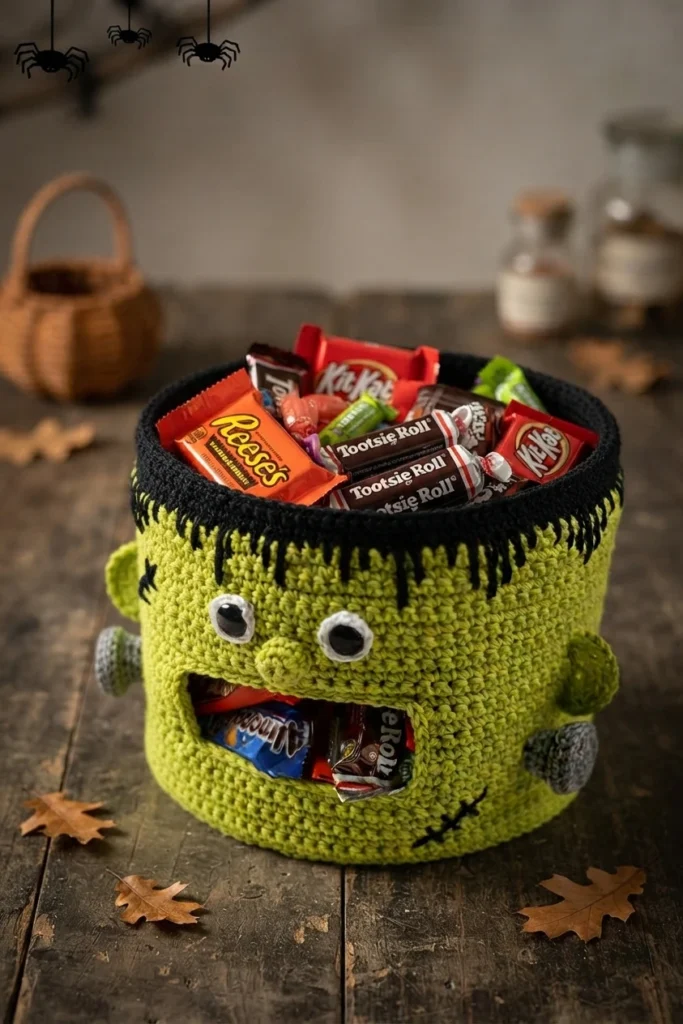
The finished basket can hold Halloween candy, work as seasonal decor, or be used as a fruit basket. The designer also suggests giving it as a Halloween or housewarming gift, with candy inside for the latter. These are possible uses for the completed bowl, rather than variations to its construction.
Materials
The sample uses two worsted-weight yarns. Gather the listed supplies before beginning; the quantities below are the sample estimates from the original pattern.
- Lily Sugar ’n Cream, size 4 worsted-weight cotton, 100% cotton, 120 yards, 70.9 g, 109 m, 2.5 oz: Hot Green, 270 yards; Black, 80 yards; White, 2 yards.
- Caron Simply Soft, size 4 worsted-weight acrylic, 100% acrylic, 5 oz, 141.7 g, 250 yards, 228 m: Grey Heather, 6 yards.
- H/8 hook, 5.00 mm, and G/6 hook, 4.00 mm.
- Measuring tape, marker for tracing, scrap yarn for round markers, and 4 to 5 locking stitch markers.
- One plastic canvas sheet measuring 12 x 18 inches and one measuring 8 x 10 inches.
- Two solid black eyes, 15 mm; scissors; tapestry needle for finishing and sewing; candy.
Abbreviations (U.S. Terms)
The pattern uses U.S. crochet terms. These definitions can help when reading the original instructions:
ch(s): chain or chains;st(s): stitch or stitches.sl st(s): slip stitch or slip stitches;sc: single crochet.hdc: half double crochet;bpsc: back post single crochet.sc2tog: single crochet decrease;yo: yarn over.SM: stitch marker;FLO: front loop only;BLO: back loop only.RS: right side;WS: wrong side;Rep: repeat;Rnd: round.- The notes also name a standing single crochet join, spike single crochet, and Special Join Technique.
Gauge
The original pattern gives measurements at points throughout the work rather than listing a separate gauge target. It describes gauge as not critical for this project. The designer notes that a tighter crocheter may need to use a smaller hook, so consult the original measurements and instructions as you work.
Skill Level
The pattern is rated Easy. Its construction includes rounds, rows, color changes, shaping, and separate pieces that are attached to the bowl. Refer to the original instructions for the specific stitch placement and assembly details.
Finished Size
The stated finished size is one size, approximately 8 inches in diameter by 7.5 inches high. The original also gives measurements for some construction stages and individual features.
Pattern Notes
Turning chains are not counted as stitches unless the instructions say otherwise. Unless a row specifies a different placement, its first stitch is worked into the same stitch as the turning chain. The designer says gauge is not critical and notes that a smaller hook may suit someone who crochets tightly.
The sample combines cotton yarn with a small amount of worsted-weight acrylic. The source says a similar cotton yarn is an option, and that other fibers, including acrylic, can also be used, though the finished bowl may be less stiff. Construction begins with two crocheted circles, continues upward into the basket walls, and ends with separate features attached to the completed basket.
Special Stitches
A spike single crochet is worked into a row below the current one. The source explains that the distance below the current row affects the length of the resulting spike. This stitch is used in the hair section. A standing single crochet and a Special Join Technique are also named in the pattern notes; consult the linked original instructions for their use and details.
Frankenstein’s Monster Crochet Candy Bowl Construction Overview
The bowl is built from the base upward. The construction includes two crocheted circles around a plastic canvas insert, basket sides, a front opening for the mouth, and a separate set of face and hair pieces. This section summarizes the stages so you can understand the project’s layout; it does not replace the designer’s full pattern or attachment directions.
Circular Base Assembly
Two crocheted circles sandwich a smaller circle cut from plastic canvas, creating the base. The source suggests using locking stitch markers to hold the layers together while they are joined around the edge. It notes that the example photos show another design, although the described techniques are the same.
Bottom Sides of Basket
The basket walls start at the joined base. This lower section begins with a back-post single crochet round, followed by single crochet rounds worked around the basket. The original gives an approximate height at the end of this stage.
Create Mouth Opening
Rows across part of the basket form the front opening, leaving space for the monster’s mouth. A chain span bridges the opening so the work can continue around the basket. The pattern gives further instructions for shaping this transition and the height at this stage.
Upper Sides of Basket
After the mouth opening is bridged, the upper sides continue in joined rounds. The first round is worked on the wrong side, and the instructions specify turning as the work progresses. The source gives an approximate height before the hair section begins.
Hair
Black yarn forms a band around the top of the basket. The first round mixes regular single crochet with spike stitches worked into earlier rounds, creating the hair’s uneven outline. The remaining rounds complete the band, including rounds worked through the back loops only.
Eyes (Make 2)
Make two small white crocheted eye bases, each with one 15 mm black eye centered on it. The materials list specifies solid black eyes but does not name a particular type. Follow the original pattern’s placement notes when attaching the completed pieces.
Attaching the Eyes
The designer places the eyes between the fifth and sixth rows of the mouth-opening section, measured inward from the mouth corners. The original gives an approximate center-to-center spacing as an additional placement reference.
Bolts (Make 2)
Two gray bolts are made separately with the smaller hook. The instructions use scrap yarn to mark rounds and describe light scrap-yarn stuffing as optional. Each piece is finished with a yarn tail for sewing to the basket.
Attaching the Bolts
The bolts are placed on either side of the mouth opening, between its second and third rows. The pattern gives stitch and distance references for positioning them. Sew them on with a yarn needle and the yarn tails, then weave in the ends.
Ears (Make 2)
Each green ear is a separate three-row piece that widens from its starting edge. Leave the specified yarn tail when fastening off so it can be used for sewing the ear to the basket.
Attaching the Ears
The ears sit behind the bolts. Their placement is described in relation to the top and sides of each bolt; the left and right positions depend on which ear is being attached. Use the original placement directions when sewing them in place.
Create Stitches
Yarn details can be added to suggest scars. The number is flexible: the designer chose two, while the source allows for more or fewer. A yarn needle and a short piece of yarn are listed for this decoration.
Mouth Edging
Green edging outlines the bottom, sides, and top of the mouth opening. The first round uses single crochet, and the second uses slip stitches with the named Special Join Technique. See the original pattern for the full edging placement and joining directions.
Reinforcing the Basket Sides
A plastic canvas strip is fitted inside the basket to support its sides. The source gives an approximate cut size and says it can be trimmed to fit. Keep the mouth opening clear; the pattern describes securing the canvas near the hairline and near the base with yarn.
Nose
The nose is a small green piece made in rounds with the smaller hook and finished with a yarn tail for sewing. Its stated position is centered between the eyes and above the mouth opening. Once the features are attached and the ends woven in, the bowl can be filled with candy.
1 thought on “Frankenstein’s Monster Crochet Candy Bowl: Pattern Overview”