Project introduction
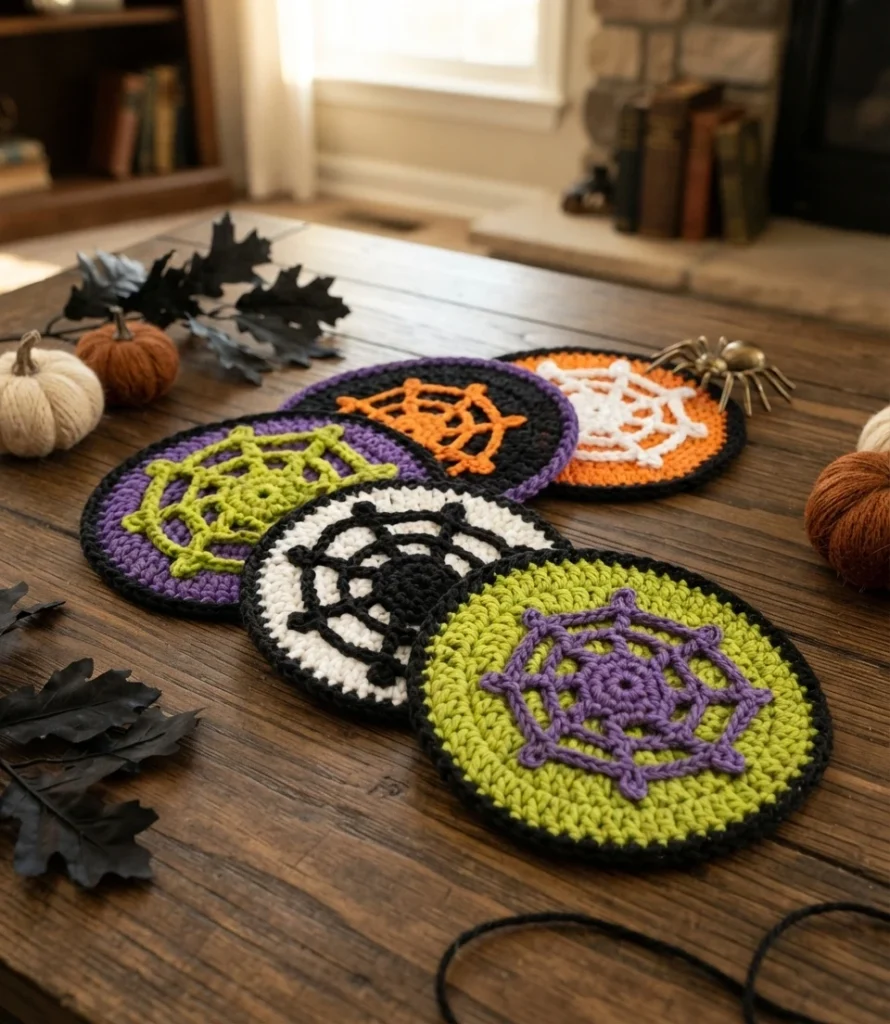
Annie Design Crochet’s Halloween coaster design combines a solid, round base with a separate spiderweb motif placed in the center. It is described as a beginner-friendly project using familiar stitches, and the small amounts of cotton yarn make it suitable for using scraps. This article is an overview of the design, not a stand-alone pattern, so use the linked source for the complete directions.
The base and web are crocheted separately, allowing you to choose colors for each piece before attaching them. The finished coaster is both decorative and practical, with a spiderweb shape that adds a seasonal touch to a table. The source also mentions a separate quick-to-make spiderweb decoration using super bulky yarn, which is a different project from this coaster.
Halloween Crochet Coasters are a Must-Make!
The coaster is intended as a quick Halloween project and uses chain, single crochet, and double crochet stitches. The source describes those basic stitches as the main skills needed. Its round base provides a place for a drink, while the contrasting web gives the piece its recognizable seasonal look.
Color is an easy way to change the mood of the set. The source suggests orange with black, or purple with green, and also allows you to use yarn from your stash. The spiderweb is a separate component rather than an openwork section crocheted into the coaster base. For another coaster design with a different look, see Peppermint Swirl Crochet Coasters: Pattern Overview.
Materials Needed
The source recommends cotton yarn for absorbency and durability, and only small amounts are needed. Although the listed materials name a specific cotton yarn and color palette, the source also says yarn scraps can be used and that other DK or light worsted cotton can give a similar effect. Choosing contrasting colors can help the web stand out against the circular base.
The web can be attached by sewing it to the center of the coaster or by using a few drops of fabric glue. Glue is also listed as optional in the materials. If you prefer a sewn finish, the finishing notes specify matching thread. The exact yarn and tool details are collected in the Materials section below.
How to get the Pattern for Halloween Crochet Coasters
The written instructions are available in the original blog post. An ad-free printable PDF, listed as four pages, is offered through Ravelry and Etsy. Choose the format that suits you and refer to the source instructions for the full stitch-by-stitch directions.
Annie Design Crochet’s original pattern and instructions
Materials
Gather the items listed in the source. Yarn amounts are given as small amounts for the named colors, rather than as a total amount for the project.
- Hobbii Rainbow Cotton 6/8, 100% cotton, listed as 50 g/75 m; 1.75 oz/114 yds [105 m].
- Small amounts of black (009), orange (057), green (084), purple (039), and white (001).
- 3.5 mm crochet hook.
- Yarn needle.
- Fabric glue or a glue gun, optional.
The source says DK-weight or light-worsted-weight cotton yarn may be substituted for a similar effect. It also notes that a slightly larger hook may be used for the edging if it does not lie flat. Consult the complete directions when deciding whether that adjustment is needed.
Measurements
The source lists the finished coaster as 5 inches [13 cm] across and the separate cobweb as 3.5 in [9 cm] across. The cobweb measurement describes the motif, not the full coaster. The source does not provide a stitch gauge in the listed measurements.
Abbreviations
The directions use US crochet terms. These abbreviations identify the stitches and common pattern references:
- sl st: slip stitch
- sc: single crochet
- dc: double crochet
- ch: chain
- st: stitch
- beg: beginning
- CC: contrast color
Special Stitches
The listed special stitch is a picot. The source defines it as chaining 3, then slip stitching back into the top of the double crochet just made. The complete directions show where the picots are used in the web motif.
Pattern Notes
Keep the beginning chains in mind while reading the instructions: a chain 3 at the start of a round counts as one double crochet, but a chain 1 at the start does not count as a stitch. The source places the stitch count for each round in italics at the end of that round. Repeat directions appear inside brackets, and the bold number indicates how many times to work them.
The instructions use US terms, and the suggested colors may be replaced with yarn from your stash. These notes help interpret the pattern notation, but they do not replace the details for joining rounds or placing stitches. Keep the full source directions available while crocheting.
Coaster Pattern Overview
The coaster base starts with a small ring and grows through joined rounds of double crochet. The listed round-ending totals are 12, 24, 36, 48, and 60 double crochet stitches. A final round in a contrast color uses single crochet to make the border and is listed as 60 stitches. The source suggests trying a slightly larger hook for that edging if it does not lie flat.
This summary describes the construction without reproducing the round-by-round instructions. The complete pattern provides the starting method, increase placement, and joining details. Following those directions is important for working the circle as intended; use this overview to understand the overall shape rather than as a substitute for the pattern.
Spiderweb Pattern Overview
The spiderweb is worked separately in a contrast color. Its center begins with single crochet, then increases before two further rounds form eight spokes. Chain spaces create the open web structure, and picots provide pointed details near the outer edge.
The source’s round summary identifies eight stitches in the first round and 16 in the second, followed by two rounds that shape the eight spokes. For the exact placement of chain spaces, skipped stitches, joins, and picots, follow the complete instructions. Those details define how the separate motif is formed and attached visually to the center of the coaster.
Finishing
The source suggests lightly steaming each coaster for a few seconds. For each cobweb, it recommends pinning the spokes, then steaming gently or spraying with water and leaving the piece to dry. Take care when using steam, and follow guidance suitable for your yarn and equipment.
Place the finished web in the center of the coaster. Attach it with a few sewing stitches using matching thread, or use the optional fabric glue or glue-gun method described in the source: add a few drops to the back of the web, press it into place, and leave it to dry. The designer’s page credits Annie Design Crochet and requests a link and designer credit when sharing makes based on the pattern.