Project introduction
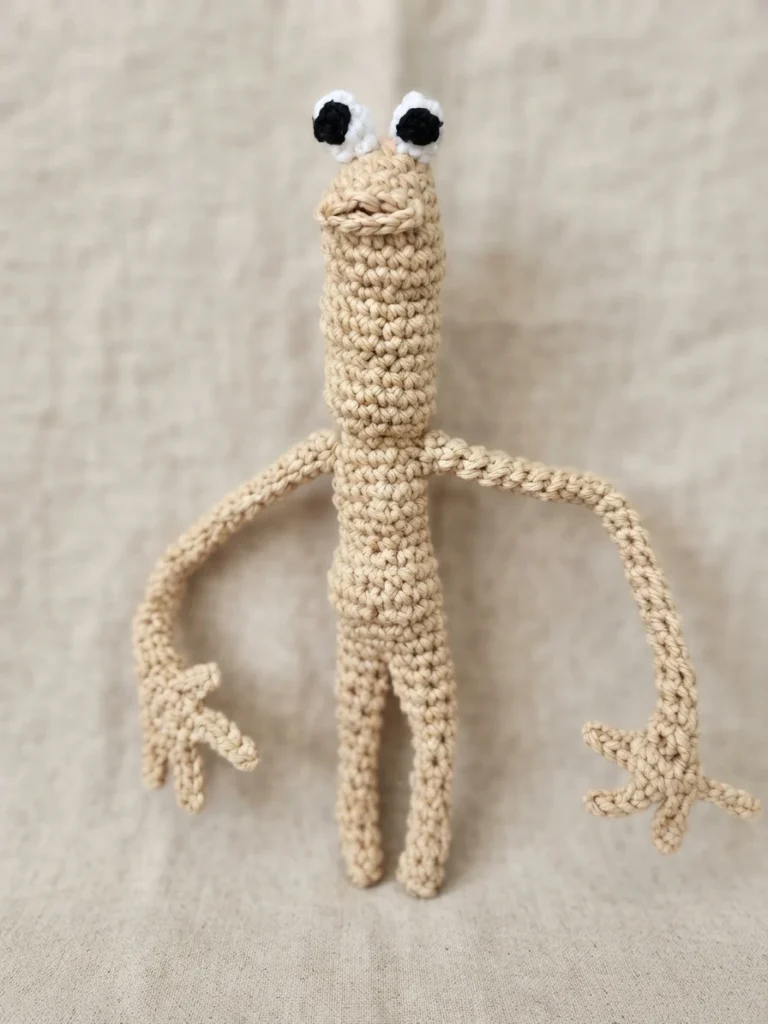
This is a pattern overview, not a full tutorial. Marcus the Worm VR is a free crochet amigurumi pattern published by Just Stitched Crochet, and this page walks through what the design involves so you can decide whether to take it on. The designer describes the project simply as a little silly guy, an advanced-level build with shaping, back loop work, and small embroidery details. The finished worm is about 8.5″ tall, and the designer notes it is not intended for children.
You can find the Original designer’s pattern and instructions at Just Stitched Crochet, where the free web version lives. That page is the place to work from, because the row-by-row directions are only there and are not reproduced here. If you enjoy this style of small, character-driven amigurumi, you may also like this Ravelry: Worry Worm Finger Puppet pattern by Divina Rocco: Pattern Overview.
Skill level is listed as Advanced. The designer points to common pattern abbreviations and repetitions, shaping, working in back loops, sc3tog, basic embroidery, and the French knot as the techniques involved. The pattern uses American English, so US terms apply throughout. Nothing about the construction is beginner-friendly in the sense of plain, flat rounds: the body is shaped as it grows, the legs are formed by splitting the thigh section, and the arms are worked separately before being sewn to the shoulders.
Pattern format and preparation
The pattern is organized into named sections: Head, Belly, Thighs, Legs, Arms, Fingers, Thumb, Lips, and Eyes. The head begins in a magic ring, and the belly continues from the body before the thighs split off to create the first leg by skipping stitches. Pipe cleaners are bent at the tips so they are not sharp, then threaded and twisted to give the legs and arms their structure. The arms are sewn at the shoulders, and the fingers and thumb are worked onto each flattened hand.
Before you start, gather everything the designer lists. The supply list is short but specific, and the optional items are worth having on hand because the small areas are the fiddly part.
- E/3.5mm crochet hook
- Worsted weight yarn in a skin color, plus small amounts of white and black (the designer used I love this cotton)
- 2 12″ pipe cleaners, white or tan/brown
- Poly Fill or other stuffing material
- Optional: tools for adding stuffing in small areas, such as a chop stick, a smaller crochet hook, a large eyed plastic yarn needle, or a felting tool
- Optional: safety eyes
A few practical notes from the source are worth remembering. The designer suggests pulling your crochet work toward the body as you go so the stitches are not stretching, and notes that depending on the length of your pipe cleaner you may need additional or fewer rounds on the legs and arms. When inserting the second pipe cleaner through the body, the designer found it helpful to push a small crochet hook through, bend the pipe cleaner tip around it, and pull it back through, replacing any stuffing that comes out.
Finished item is not intended for children.
The eyes are made as two small pieces, not stuffed, then sewn to the top of the head. The designer embroidered the eyes with a small amount of black using an embroidery chain stitch. Safety eyes are listed as an option, though the designer could not get a good size to fit into such a small area. The belly button is a French knot, and the lips are worked into the front loops of earlier head rounds, so those finishing steps come after the main body is complete.
Because this is an overview rather than a lesson, treat the section names above as a map of what you will be doing, not as instructions. The order matters, the shaping matters, and the pipe cleaner placement matters. Work from the original designer’s page for every round and every count.